Picture this: You’re ready for a weekend cruise, but your classic car sputters and dies after just a few miles. You check the fuel lines, and lo and behold, you find rust. Rust in your gas tank is a common problem, especially for older vehicles or those stored improperly. It’s a headache, but it doesn’t have to ruin your day. This guide will walk you through how to clean a rusty gas tank, getting you back on the road. We’ll explore the tools, techniques, and precautions you need, giving you the knowledge to handle this issue yourself. By the end, you’ll feel confident in tackling the process and restoring your fuel system, increasing its lifespan and performance.
Reasons Your Gas Tank Gets Rusty
Rust, in its simplest form, is iron oxide. It occurs when iron, the main component of steel (often used in gas tanks), reacts with oxygen and water. There are many reasons why a gas tank becomes a victim of this process. It can be due to condensation, low fuel levels, or the presence of ethanol in modern gasoline. Understanding the factors that contribute to rust formation is a crucial step towards preventing it. The goal is to address the source to prevent future problems. The fuel tank’s construction material, the environment it lives in, and the fuel it houses all play a part.
Moisture Intrusion and Condensation
Moisture is the primary enemy of a gas tank. Even a small amount of water can start the corrosion process. Condensation is the build-up of water that forms on the inside walls of the tank. This often happens due to temperature changes. When the weather gets warmer, air inside the tank expands and pushes out some moisture. When it cools down, that vapor condenses on the cold metal, creating the right conditions for rust to appear. This is especially true for tanks that are not completely full. Low fuel levels create more space for air and moisture to accumulate.
- Temperature Fluctuations: Rapid swings between hot and cold conditions lead to condensation. This is more common in vehicles parked outdoors or in areas with significant seasonal changes.
- Air Leaks: Cracks in the tank, fuel cap, or vent lines can allow outside moisture to enter. Even tiny openings can provide a pathway for water vapor.
- Vehicle Storage: If a vehicle is stored for an extended period, the likelihood of condensation increases. Without regular use, moisture can sit on the tank’s surface, accelerating the rusting process.
- Fuel Type: Some gasoline blends attract moisture more than others. The additives in certain fuels can also create conditions that encourage corrosion.
Fuel Quality and Ethanol’s Effect
The type of fuel used can significantly impact the gas tank’s condition. Modern gasoline, especially fuels containing ethanol, contributes to rusting issues. Ethanol absorbs water, which creates an environment where rust easily forms. Besides moisture absorption, ethanol can also loosen deposits and rust particles within the tank. These particles then circulate through the fuel lines and can cause further damage to the engine. The fuel’s stability also plays a role; fuel that breaks down over time can lead to sediment and residue that can promote corrosion.
- Ethanol’s Corrosive Nature: Ethanol attracts water, increasing the risk of rust. It can also dissolve some of the protective coatings inside the fuel tank.
- Fuel Additives: Certain additives in gasoline can accelerate rust formation. Some additives may react with the tank’s metal or the existing rust, worsening the issue.
- Fuel Degradation: Over time, fuel breaks down and forms sludge, which can clog fuel lines and contribute to rust. This is more common with vehicles stored for long periods.
- Fuel Storage: Storing fuel for extended periods can increase the likelihood of fuel degradation. This is particularly problematic if the fuel is exposed to heat or direct sunlight.
Material Composition and Tank Age
The age and material composition of the gas tank can determine its vulnerability to rust. Older vehicles usually have steel tanks that are more susceptible to corrosion than newer tanks. The protective coatings applied during the manufacturing process may wear off over time. The tank’s design, including its shape and the presence of baffles, can also affect how moisture and fuel interact with the metal. Regular inspections of the gas tank are a good practice. This helps you catch issues before they turn into major problems. Choosing a tank made of rust-resistant materials is a great long-term solution.
- Steel vs. Other Materials: Steel tanks are more prone to rust than those made of aluminum or other materials.
- Protective Coatings: Older tanks might not have the same protective coatings as new ones. These coatings can deteriorate over time, exposing the metal to corrosion.
- Manufacturing Defects: Imperfections during the manufacturing process, such as thin spots in the metal or gaps in the coating, can accelerate rust formation.
- Age of the Tank: Older tanks, regardless of material, have likely been exposed to more environmental factors. They’re more likely to have some level of corrosion.
Supplies You’ll Need to Clean a Rusty Gas Tank
Before you begin the cleaning process, gather all necessary supplies. Doing this beforehand will ensure a smooth workflow and will prevent any frustrating interruptions. A well-stocked kit is a sign of careful preparation, and it helps you to complete the task efficiently. Having the right tools, cleaners, and safety gear makes a significant difference in the end result. Getting prepared now minimizes risks and maximizes success.
Safety Equipment
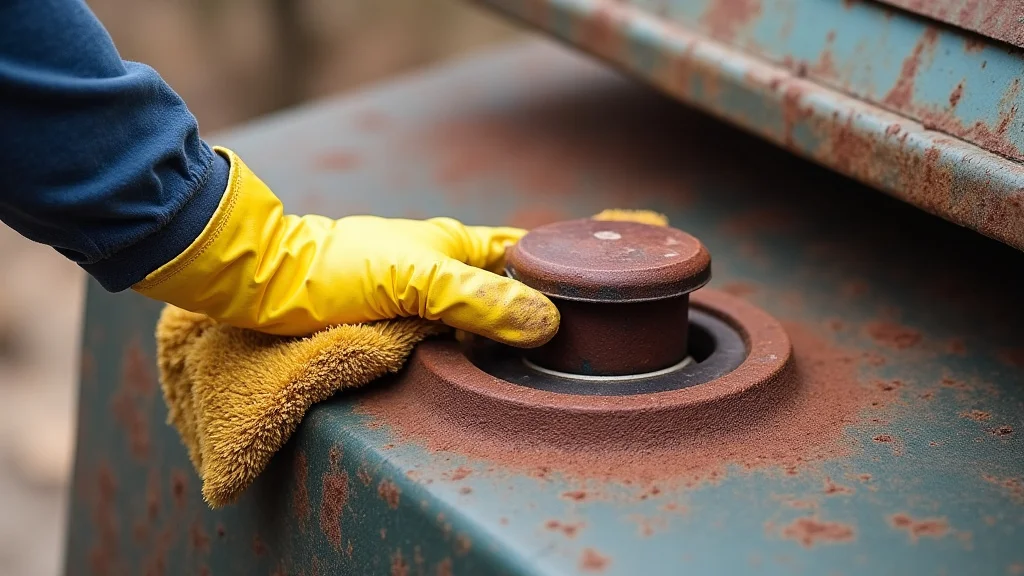
Safety should be your top priority. Working with gasoline and rust requires careful handling and the right protective gear. Eye protection shields you from splashes and flying debris. Gloves protect your hands from contact with gasoline and cleaning chemicals. Good ventilation prevents the inhalation of harmful fumes. This step is about protecting your health during the how to clean a rusty gas tank process.
- Safety Glasses or Goggles: Protect your eyes from splashes and flying particles.
- Chemical-Resistant Gloves: Protect your skin from gasoline and cleaning solutions. Nitrile or similar gloves are recommended.
- Respirator or Mask: Prevent the inhalation of gasoline fumes and rust particles. A respirator with organic vapor cartridges is suggested.
- Proper Ventilation: Perform the cleaning process in a well-ventilated area to minimize exposure to harmful fumes. An open garage or outdoor space is ideal.
Cleaning Agents and Solvents
The selection of the right cleaning agents is key to removing rust and residue from the tank. You’ll need specialized solutions designed for this job. These products work to dissolve rust and neutralize corrosive elements. The right solvents can also help to dissolve any leftover varnish. Make sure to follow the instructions carefully for each cleaner you use. Some cleaners will require you to use more water, while others should never come into contact with water.
- Fuel Tank Cleaner: Choose a cleaner designed to remove rust and debris. Look for products that also prevent future corrosion.
- Rust Remover: Select a rust remover appropriate for use in fuel tanks. Some products work best when the tank is completely empty.
- Water or Solvent Rinse: Use water or a solvent such as acetone to rinse the tank. The solvent you choose should be the same one recommended by the manufacturer.
- Fuel Stabilizer: Consider adding a fuel stabilizer to the tank to prevent future rust formation, especially if the vehicle will be stored for a while.
Tools and Equipment
Besides cleaning agents, a few tools are also crucial. You’ll need tools to remove the tank, inspect it, and agitate the cleaning solutions. These tools will enable you to reach all parts of the tank. Having the right tools also speeds up the process. Make sure the tools you use won’t damage the tank or the surrounding parts. The more organized you are, the easier the work will be.
- Wrenches and Screwdrivers: For removing the tank and fuel lines. Ensure you have the right sizes to match your vehicle’s components.
- Drain Pan: To safely collect any remaining fuel during the tank removal. Make sure the pan is large enough to contain all the fuel.
- Inspection Light or Flashlight: For examining the inside of the tank. This helps assess the extent of rust and ensure thorough cleaning.
- Pressure Washer or Hose: To rinse the tank after cleaning. Make sure your hose doesn’t have too much pressure, which might damage the tank.
- Gloves, Brushes, and Scrapers: Use these tools for cleaning the tank’s exterior and removing loose rust.
Steps to Clean and Restore Your Gas Tank
The process of cleaning and restoring a rusty gas tank involves several critical steps. Proper preparation is essential. It includes emptying the tank, removing it from the vehicle, and inspecting it. The cleaning phase requires the use of specialized agents and techniques to remove rust. This stage will prepare the surface for a protective treatment. When done right, the tank will be restored to near-original condition, prolonging its lifespan. Keep in mind that patience and care are key to success.
Removing the Gas Tank and Initial Inspection
Carefully removing the tank from your vehicle is the first step in the cleaning process. This task requires careful attention to detail. This prevents the chance of spills or damage. Inspection helps determine the scope of the cleaning work. The more accurately you assess the situation at this stage, the more effective your cleaning will be. The condition of the tank and fuel lines will tell you a lot.
- Disconnect the Battery: Before starting any work, disconnect the negative battery cable to prevent electrical sparks.
- Drain the Fuel: Use a siphon or drain the fuel from the tank into a suitable container. Work in a well-ventilated area away from any open flames or sparks.
- Disconnect Fuel Lines and Electrical Connectors: Carefully detach the fuel lines, fuel pump wiring, and any other connections. Mark each component if needed. This step is about how to clean a rusty gas tank.
- Unbolt and Remove the Tank: Locate the bolts or straps holding the tank in place. Support the tank as you remove the fasteners, and carefully lower it from the vehicle.
- Inspect the Tank: Examine the tank for rust, leaks, and damage. Check the fuel lines, the fuel pump, and the sending unit for any signs of corrosion or wear.
Cleaning and Rust Removal Process
This is where you’ll roll up your sleeves and get your hands dirty. It involves using the cleaning agents to remove rust and residue. This ensures that the interior surface is clean. Then comes the step of protecting the tank from future corrosion. Follow the instructions to get the best results. The right cleaning methods will return the tank to its peak performance. By taking these steps, you’re improving your car’s overall condition.
- Prepare the Cleaning Solution: Mix the rust remover or fuel tank cleaner according to the manufacturer’s instructions. Always wear protective gear, including gloves and eye protection.
- Pour the Cleaning Solution into the Tank: Carefully pour the cleaning solution into the tank. Ensure the solution covers all surfaces.
- Agitate the Solution: Seal the tank openings and shake or rotate the tank to ensure the solution reaches all parts. You might want to use a chain or gravel inside the tank to help remove rust.
- Let It Soak: Allow the cleaning solution to sit in the tank for the recommended time. This could range from a few hours to a day, depending on the product and the severity of the rust.
- Rinse Thoroughly: After soaking, drain the cleaning solution and rinse the tank with water or a solvent, following the product’s instructions.
- Dry the Tank Completely: Use compressed air or allow the tank to air dry completely. Make sure all moisture is removed to prevent future rust.
Sealing and Reinstallation
The final step involves protecting the tank and putting it back in place. This includes applying a sealant to prevent future corrosion. By following these steps, you’ll ensure that the gas tank stays clean and rust-free. This approach will maximize its lifespan and ensure optimal performance for years to come. The work you put in at this stage contributes to the long-term health of your vehicle.
- Inspect the Tank Again: After cleaning and drying, inspect the tank again to ensure all rust is removed. Look for any damage or remaining debris.
- Apply a Tank Sealer (Optional): Use a fuel tank sealer to coat the inside of the tank. This provides a protective barrier against future rust. Follow the product’s instructions for application.
- Reinstall the Tank: Carefully reinstall the tank in your vehicle. Connect the fuel lines, fuel pump wiring, and any other components you disconnected earlier.
- Refuel and Check for Leaks: Fill the tank with fuel. Inspect all connections for leaks and start the engine to check for any fuel system problems.
- Monitor the Tank: Keep an eye on the tank and fuel system for any issues. Consider adding a fuel stabilizer to help prevent future rust.
Cleaning a Rusty Gas Tank: Troubleshooting Common Problems
Despite careful efforts, you might encounter issues during the gas tank cleaning process. This section provides solutions to the most common problems. Knowing these solutions can save time and prevent frustration. When you are prepared for potential issues, you can confidently address them. Being able to quickly identify and fix problems ensures you get the job done right.
Dealing with Stubborn Rust
Sometimes, despite your best efforts, rust can be difficult to remove. This occurs when the rust is particularly heavy. Or, it could be the result of using ineffective cleaning methods. Knowing the correct approach to deal with persistent rust is key to a successful cleaning. Trying different techniques can help to get rid of stubborn rust. Success requires persistence and a methodical approach.
- Use Stronger Cleaners: If the initial cleaning isn’t enough, try a stronger rust remover. Choose a product specifically made for fuel tanks. Make sure it is compatible with the tank material.
- Mechanical Agitation: Combine chemical cleaning with mechanical agitation. This means using a chain or a handful of small gravel inside the tank. Shake the tank to help remove stubborn rust particles.
- Repeat Cleaning Cycles: You might need to repeat the cleaning process multiple times to completely remove the rust. Allow each cleaning solution to soak for an extended period.
- Consider Professional Help: If all else fails, a professional service might be required. They can offer specialized equipment. That can include tank repair services, which could be the best solution.
Addressing Leaks and Damage
During the cleaning process, you might find leaks or damage in your tank. These problems are often a result of rust eating away the metal. It’s important to address these issues to ensure the fuel system’s integrity. The methods for dealing with leaks and damage can vary. They may need simple repairs or may require more comprehensive solutions. Addressing these issues will secure the safety and reliability of your fuel tank.
- Assess the Damage: Carefully inspect the tank to determine the extent of the damage. Identify the locations and sizes of any leaks or cracks.
- Small Leaks: For minor leaks, you might use a fuel tank repair epoxy or sealant. Clean and prepare the damaged area, then apply the sealant following the product’s instructions.
- Welding: Larger leaks or significant damage might require welding. This can include professional welding services from someone who knows metal.
- Tank Replacement: In severe cases, where the tank is badly damaged or weakened, consider replacing it. This ensures the best long-term reliability.
Preventing Future Rust Formation
Preventing rust after cleaning is just as essential as the cleaning process itself. This requires a few preventive measures to protect your tank. This will give you confidence that you have taken all possible steps to safeguard your fuel tank. You’ll be able to enjoy your vehicle and keep it running smoothly for many years. Regular maintenance and care can go a long way.
- Use a Fuel Stabilizer: Add fuel stabilizer to your gas tank, especially if you store your vehicle for an extended period. It can prevent fuel degradation and rust formation.
- Maintain Fuel Levels: Keep the fuel tank as full as possible, especially during storage. This reduces the air volume inside, which minimizes the chance of condensation.
- Regular Inspections: Inspect your gas tank regularly for any signs of rust, leaks, or damage. Early detection allows for prompt action, preventing significant problems.
- Proper Storage: Store your vehicle in a dry environment. This minimizes moisture exposure. Use a garage or a covered area to keep the vehicle shielded from the elements.
Frequently Asked Questions
Question: What causes rust in a gas tank?
Answer: Rust in a gas tank is mainly caused by a combination of moisture, oxygen, and the iron content in the tank’s steel. Condensation, low fuel levels, and ethanol-containing fuels can accelerate the process.
Question: Can I use any rust remover in my gas tank?
Answer: No, it’s critical to use a rust remover designed specifically for fuel tanks. Ordinary rust removers may contain chemicals that can damage the tank or contaminate the fuel system.
Question: How often should I clean my gas tank?
Answer: There is no set frequency, but you should inspect your gas tank at least once a year. If you notice signs of rust or fuel contamination, clean it right away.
Question: Is it safe to weld a gas tank?
Answer: Welding a gas tank can be dangerous due to the risk of explosions from fuel vapors. It is usually best to have this done by a professional experienced in fuel tank welding.
Question: How do I prevent rust after cleaning my gas tank?
Answer: Use fuel stabilizers, keep your fuel tank as full as possible, and store your vehicle in a dry environment. Inspect the tank regularly for any signs of rust or damage.
Final Thoughts
Taking care of a rusty gas tank can seem complicated, but with the right approach, it’s a manageable task. You now know the key steps involved: proper preparation, the correct tools, and the methods to effectively remove rust. Remember the significance of safety and attention to detail throughout the process. Don’t skip any steps. By following these guidelines, you can restore your fuel system. You can get your vehicle running smoothly again, avoiding costly repairs. With consistent care, your fuel tank should give you many years of dependable service. Now, you can confidently address how to clean a rusty gas tank and enjoy the open road.

